Last updated on December 21st, 2023 at 06:15 am
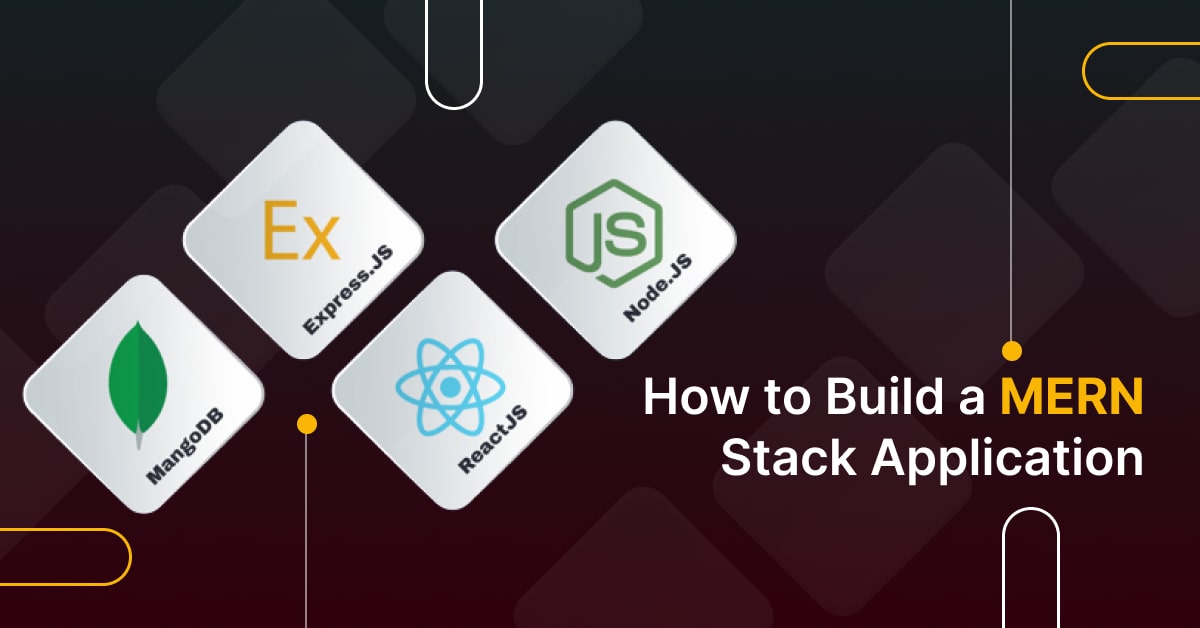
Software development is prevalent in a world where technology is changing quickly. The MERN stack, which stands for MongoDB, Express.js, React.js, and Node.js, is a well-known tech stack used for web app development. Learning how to build a MERN stack application can empower you to become a full-stack developer, allowing you to achieve faster speeds, streamline the development process, and utilize more advanced components.
It gives users a personalized and exciting experience and lets businesses create changeable app designs. MERN is a proven stack technology that can be used for projects of any size because it only needs to consider one language. MERN is a good choice for even new writers because it is becoming more common and only requires one language.
In this blog, we’ll look at MERN Stack, how it works, how easy it is to build MERN Stack and the benefits of MERN Stack development.
How Does MERN Stack Work?
Today’s most popular web app development techniques are combined in the MERN Stack. There are four technologies involved here: MongoDB, Express, React, and NodeJS. This tool is easy to use for developers who want to create web apps. MERN is a good choice for building apps that handle many users and requests simultaneously.
MERN stands for one of the following options:
- MongoDB: A NoSQL database lets you store information in papers that look at fields rather than rows. It is very flexible and can be used with different computer languages like Python, Java, Ruby, PHP, etc.
- Express: It is an open-source web app system built on top of NodeJS that makes it easy to build RESTful APIs using tools and middleware made by the community.
- ReactJS is a JavaScript tool Facebook uses to build and handle user experiences. It can be used to make mobile, web, and PC apps and is very flexible in how it is set up and used.
- NodeJS: A platform built on Chrome’s JavaScript engine that makes it easy to develop fast and scalable network apps. NodeJS is one of the best JavaScript systems. It uses an I/O model that doesn’t block and is driven by events. It is fast and easy to use, and it works well for real-time apps that use a lot of data and run on several different computers.
The Architecture of the MERN Stack Development
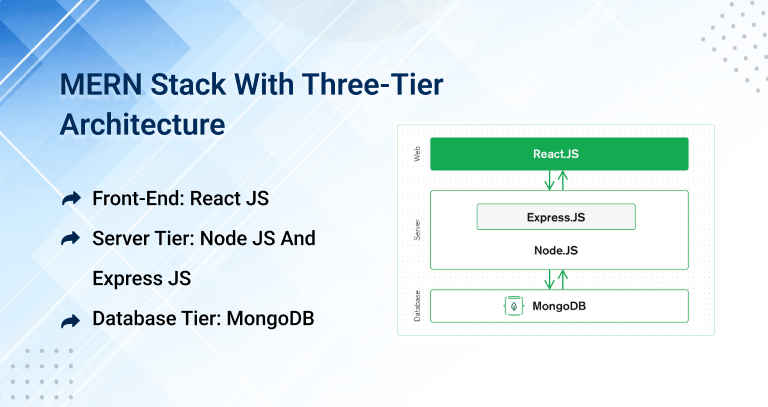
The MERN Stack is a group of technologies that work well together. It is used to make computer apps that many people can use. The MERN design makes it easy to build 3-tier systems with front-end, back-end, and database parts because it uses JavaScript and JSON.
Front-End: React JS
The central part of the MERN stack is React JS, a JavaScript-based system that helps to build HTML apps running on the client side. Simple components can be used to construct complicated interfaces that connect to data on a back-end server and output HTML.
React is fast and stable, and it manages data-driven interfaces with less code, which is a benefit of the MERN Stack. It lets you handle groups, forms, events, and errors in one place.
Server Tier: Node JS and Express JS
The fact that the server-side framework ExpressJS runs on a NodeJS server is one of the best things about the MERN stack. ExpressJS is a free, fast, and minor web platform for NodeJS. It uses modules to match a URL with a server code that can handle HTTP requests and replies.
You can use XML HTTP requests or ReactJS front-end Posts to connect with ExpressJS methods that make your app better. This feature looks at Node.js drivers for MongoDB so that you can read and change data in your databases.
Database Tier: MongoDB
One benefit is that the MERN stack can keep track of data for content, uploads, user accounts, events, and notes. In a perfect world, a database would work well with React, Express, and Node without problems.
On the front end, ReactJS makes the JSON files, which are then sent to the ExpressJS server, to be processed and stored in MongoDB for easy recovery. You can get different stacks from the MERN stack by making web apps that meet the basic needs of systems.
Reasons to Choose MERN Stack For Web App Development
Here are some reasons why MERN stack development is a good choice and how it can help your full-stack development project.
Front-End Development
The MERN stack considers two parts such as the front end and the back end. The collection is different from everything else. The system uses the RESTful API as a tool that can be easily reused for other apps like mobile software.
The RESTful API can connect puzzle sets that use HTTP and look like web communication, making them essential parts of the MERN stack. It also makes it easy for developers to create new front-ends and apps that work well with the system.
Open-Source
MERN is a well-known choice for new businesses, and technology experts worldwide are working quickly to improve it. One of the best things about MERN stack development is that the whole stack is open-source, which makes it easy to create robust web apps.
Full Stack Development
MERN looks at the full stack development method, which means that both the back-end and front-end of an app need to be built. This method takes ideas from both user interface design and software engineering and combines them. It has become more popular with start-ups because it can save them money.
With the full-stack method of MERN, start-ups can save money by not having to hire separate workers for front-end and back-end development. Instead, they can handle both tasks in-house.
Strong Community Support
MERN stack is becoming increasingly popular because it has tools that make the front end, back end, and database work together. Because of how well-known it is, more and more people are coming forward to help writers find the best answer.
It Saves Money and Time
Because JavaScript is used in every part of the MERN stack, the MERN Stack Development company can save time and money by hiring only JavaScript experts instead of experts in many different technologies. This way could speed up the hiring process and save time and money.
Tailored User Experience
A MERN Stack developer can use the many customization options for both platforms, which makes it easy to change the user experience without having to use controls on the server. It helps to make the user’s experience more personalized.
Reusable Code
MERN Stack allows web app development that can be swapped out. It makes it easy to reuse code across different eCommerce channels, making eCommerce development faster and smoother with less downtime.
Scalable and Cloud Compatible
Scalability will never be a problem because data is constantly being considered on all channels. The MERN stack thinks the Scalable NoSQL database (MongoDB) works well with cloud storage. Node.js, on the other hand, Node.js improves the working power and makes it easy to handle platform data from anywhere in the world.
Flexibility
The MERN Stack is more adaptable to make an enormous range of web apps. For example, you could use it to build an accessible web app or a complicated, high-performance web app.

How to Build A MERN Stack Application – Step By Step Process
We can build full-stack solutions with the help of MERN. So, the MERN stack development company can use it to its fullest ability. We will work on both the front end and the back end of this project.
The front end would be done with React, and the back end would be done with Node, MongoDB, and Express. The front-end customer and the back-end service would be called clients.
Before you can start, you will need to do the following:
Step 1: Install Node
Visit https://nodejs.org/en/ to install Node or download either the LTS or the current version.
Step 2: Make A New Node Project
Once Node.js and MongoDB are loaded, you can create a project area for your Node project. Then, you need to open a new terminal window, create a new node js project directory in any convenient place on your local machine, and switch to that directory by running the following code:
mkdir myProject && cd myProject
mkdir server && cd server
The code below will start a new Node.js project:
npm init -y
A new package.json file will be developed. It will look at some information about your program and what it needs to run.
The given below coding will use in dependencies installation:
npm install express cors dotenv
Several keywords are taken into account in the above code:
- Put the website structure for Node.js in place with Express.
- For downloading the Node.js package by Cors, you may allow cross-origin resource sharing.
- For loading the environment variables from a.eve file into the eve file to install the Node.js package in dotenv. It lets you to keep the setup files separate from the code.
- The package.json file lets us look at the loaded requirements. It must have a list of the tools and their versions.
Step 3: Make A Node.js Express Server
You can start by making a file called server.js and putting the following code in it.
myProject/server/server.jsconst express = require("express"); const app = express(); const cors = require("cors"); require("dotenv").config({ path: "./config.env" }); const port = process.env.PORT || 5000; app.use(cors()); app.use(express.json()); app.use(require("./routes/record")); // Get MongoDB driver connection const dbo = require("./db/conn"); app.listen(port, () => { // Perform a database connection when server starts dbo.connectToServer(function (err) { if (err) console.error(err); }); console.log(`Server is running on port: ${port}`); });
In this case, we have to think about Express and cors. Along with this, const port process.env.port checks config.env for the port variable we need.
Step 4: Install Mongoose and MongoDB
In this step, we will use the free option of the cloud-based MongoDB Atlas database as a service. It is an easy way to get things to work with MongoDB. Mongoose will be thought of as the front end of your MongoDB database. Mongoose is the object modelling tool for MongoDB that works in an asynchronous environment.
Using the npm package manager, you may add Mongoose to your Node.js project (package.json) like any other dependency. You can install it by putting the following code in your project folder:
npm install mongoose
The above code’s Mongoose and MongoDB database drivers allow your Node.js apps to connect to the database and work with the data.
Step 5: Connect to the MongoDB Database
We should connect our server to the database now. You need to open a terminal window inside your server directory and type the following code: > touch config.env
You must give your MongoDB Atlas database’s link string to the new ATLAS_uri setting in the config.env file.
Go to your cluster in Atlas and click the CONNECT button. When you do this, the Cluster Connection Wizard will start up. If you haven’t considered this, the Wizard will ask you to add your current IP address to the IP Access List and make a MongoDB user. Note the account and password you use for the new MongoDB user. It will need in the upcoming stage.
Next, the Wizard will ask you to pick a way to join. Choose to connect your app. When the Wizard asks which driver version you want, choose Node.js and 3.6 or later.
Your file should look like this one:
myProject/server/config.envATLAS_URI=mongodb+srv://<username>:<password>@sandbox.jadwj.mongodb.net/employees?retryWrites=true&w=majority PORT=5000
Next, make a new folder called ‘db‘ under the server path.
> mkdir db && cd db
Inside it, make a file—conn. Js. Afterwards, we can join our database by adding the below code.
touch conn.js
myProject/server/db/conn.jsconst { MongoClient } = require("mongodb"); const Db = process.env.ATLAS_URI; const client = new MongoClient(Db, { useNewUrlParser: true, useUnifiedTopology: true, }); var _db; module.exports = { connectToServer: function (callback) { client.connect(function (err, db) { // Verify we got a good "db" object if (db) { _db = db.db("employees"); console.log("Successfully connected to MongoDB."); } return callback(err); }); }, getDb: function () { return _db; }, };
Step 6: Make the Server API Endpoints/Routes Database
Once developing the server, it’s time to talk about the Server API routes. First, let’s make a folder called routes and put record.js in it. Go back to your “server” directory and create a new file and directory:
> cd ../server && mkdir routes
touch routes/record.js
Copy and paste the code below into the routes/record.js folder:
myProject/server/routes/record.jsconst express = require("express"); // recordRoutes is an instance of the express router. // We use it to define our routes. // The router will be added as a middleware and will take control of requests starting with path /record. const recordRoutes = express.Router(); // This will help us connect to the database const dbo = require("../db/conn"); // This helps convert the id from string to ObjectId for the _id. const ObjectId = require("mongodb").ObjectId; // This section will help you get a list of all the records. recordRoutes.route("/record").get(function (req, res) { let db_connect = dbo.getDb("employees"); db_connect .collection("records") .find({}) .toArray(function (err, result) { if (err) throw err; res.json(result); }); }); // This section will help you get a single record by id recordRoutes.route("/record/:id").get(function (req, res) { let db_connect = dbo.getDb(); let myquery = { _id: ObjectId(req.params.id) }; db_connect .collection("records") .findOne(myquery, function (err, result) { if (err) throw err; res.json(result); }); }); // This section will help you create a new record. recordRoutes.route("/record/add").post(function (req, response) { let db_connect = dbo.getDb(); let myobj = { name: req.body.name, position: req.body.position, level: req.body.level, }; db_connect.collection("records").insertOne(myobj, function (err, res) { if (err) throw err; response.json(res); }); }); // This section will help you update a record by id. recordRoutes.route("/update/:id").post(function (req, response) { let db_connect = dbo.getDb(); let myquery = { _id: ObjectId(req.params.id) }; let newvalues = { $set: { name: req.body.name, position: req.body.position, level: req.body.level, }, }; db_connect .collection("records") .updateOne(myquery, newvalues, function (err, res) { if (err) throw err; console.log("1 document updated"); response.json(res); }); }); // This section will help you delete a record recordRoutes.route("/:id").delete((req, response) => { let db_connect = dbo.getDb(); let myquery = { _id: ObjectId(req.params.id) }; db_connect.collection("records").deleteOne(myquery, function (err, obj) { if (err) throw err; console.log("1 document deleted"); response.json(obj); }); }); module.exports = recordRoutes;
It’s time to start up your server to see if it works. Open your console in the same folder as your server.js file and command as follow:
node server.js
If everything works out, the given below outcome will happen:
Server is running on port: 5000
Successfully connected to MongoDB.
That’s it for the back end. We will now start to work on the front end.
Step 7: Create a React Application
To launch your React app, run the create-react-app command from the root folder of your project:
npx create-react-app client
A new location will be made for your React front-end app. Go to the client folder and look at the code for our React application.
cd client && ls
Open a new terminal window in the “client” area and install two more dependencies:
npm install bootstrap react-router-dom
Bootstrap lets you to quickly launch a template and components for your new web app without writing the code from a basic level.
React-router-dom puts together web apps with React router components.
Step 8: Set Up the React Router
To set up the React Router, first, remove the src folder:
rm src/**/*
Next, you need to add two new files: index.js and App.js.
touch src/index.js src/App.js
Consider the given command to the src/index.js file:
import React from “react”;
import ReactDOM from “react-dom”;
import App from “./App”; import { BrowserRouter } from “react-router-dom”;
ReactDOM.render( <React.StrictMode>
<BrowserRouter>
<App />
</BrowserRouter>
</React.StrictMode>,
document.getElementById(“root”)
);
We use <BrowserRouter> to keep our UI in sync with the URL and to remember the current location in the browser’s address bar. This makes it easier to make smooth changes when updating components.
Step 9: Create the React Components
Make a folder called “components” inside the “src” path. We will add a new.js file to the components folder for each component we make.
The app needs to do these three things:
- Make a new employee
- Change an employee’s information
- See all workers
We will make create.js, edit.js, navbar.js, and recordList.js for each job.
mkdir src/components
(cd src/components &&
touch create.js edit.js navbar.js recordList.js)
This is what each file will look like in a snapshot:
create.js
Users can make a new record by using this part. This part will tell our computer to make something.
edit.js
It will have a style similar to the make component and send an update command to our server at some point.
recordList.js
It will use a GET to get all the information from our database.
navbar.js
In the context of the navbar.js component, we will make a menu bar that will link us to the other necessary details.
Step 10: Testing
You have finished making all of the parts. You also used fetch to connect your React app to the back end. Fetch lets you handle HTTP calls in a simpler and faster way. Fetch uses create.js, edit.js, and recordList.js, which take HTTP calls.
After closing all the processes, we follow these steps to start the app:
Start by typing the following command into a new terminal window in the server directory:
node server.js
Open a new terminal window in the client location and type the following command:
npm start
The application should be viewable on your computer.

Use Cases for the MERN Stack in Web Development
The MERN stack’s primary goal is to improve any program’s speed. It will be beneficial for handling projects that are big and hard to understand. But it works better for developing apps for mobile devices. Here are some ways that MERN can use:
1. Expense-tracking apps
With the MERN stack, you can make apps that track expenses with a lot of data. It will help people to keep track of the money they spend every day. With this JS framework, you can also add data to display features such as:
- Keeping track of daily costs;
- Managing tax payments;
- Tracing sales and receipts; and
- Comparing actual spending to planned spending.
2. Remote learning apps
Building web-based training apps is another crucial way to use MERN. The COVID-19 outbreak was a turning point that allowed people to learn from afar. The following can be true of online school apps made with MERN:
- Check on students’ progress
- Upload lessons with chapters
- Share documents
- Chat within the app
3. Media streaming apps
One of the best ways to use the MERN stack is to develop social media apps where people can talk to each other. You can make a social media page with the following features using this JS framework:
- Sharing posts
- Online ads
- News gathered from the web
- Commenting and liking
4. Web-based marketplace apps
The MERN stack is suitable for making apps for digital e-commerce. With this JS framework, you can make web-based marketplace apps with essential to advanced features, such as:
- Managing inventory;
- Handling payments;
- Letting people sign up or log in through social media;
- Bidding in real-time
5. Calendars and To-do Apps
A calendar or to-do app is an important project that every coder should work on when learning a new stack or switching to it. It can tell you a lot about how the chosen stack works. You can use ReactJS to create the front end for these apps and MongoDB to store, read, and change the data.
6. Interactive Forums
MERN can also be used to make an engaging discussion, like a social media site or a website where people can share notes and talk to each other.
How Much Will It Cost To Make a MERN Stack Application
A basic MERN Stack application that lets online funds to send in a way that is safe, clear, fast, and easy needs a budget of at least $40,000, and a time frame of 3 to 4 months are required.
It will cost between $40,000 and $80,000 to make a single-platform MERN Stack game with essential features and a simple user experience.
On the other hand, an advanced option with more features and current technology will cost between $80,000 and $150,000.
- A simple MERN Stack app costs between $40,000 and $60,000.
- The average cost of a MERN Stack app is between $70,000 and $80,000.
- You may require $80,000 or more for a complex MERN Stack application.

Conclusion
MERN stack gives you many benefits immediately and helps keep your audience interested. A coder who works with the MERN stack is a plus point. Full-stack programming is a job that needs knowledge of many different tools and topics.
It is trendy because it combines all these various fields of expertise into one. MERN-stack developers can give any mix of web development, mobile app development, and UI/UX design services to make sure that apps are of the best quality.
If you are starting and doing start-ups, choose MERN Stack because it is an open-source technology that computer experts worldwide work to improve constantly.
Also, because every part of the MERN stack is open source, you can use it to build powerful web apps. eBizneeds is one of the best places to hire MERN stack developers with many skills and knowledge.
FAQs On MERN Stack Development
How does MERN Stack work?
MERN is a new web development platform that lets you make highly involved web apps for desktop and mobile devices using only JavaScript framework. It has a lot of libraries, frameworks, and tools that all work together to speed up development and make it easier to build apps.
Do a higher number of people demand MERN Stack?
The MERN stack is getting increasingly popular daily, making it the best choice for a business and a student to learn.
Is MERN stack a back-end or a front-end technology?
You can do Full-stack programming with MERN Stack, which uses React.js for the front end and Node.js for the back end.
How do you find the best full-stack developers?
If you want to hire a full-stack developer, knowing what you want is the best way to do it. You must understand exactly what you require to perform. It doesn’t matter if you need help with one part of your job or help with everything.
What skills do a MERN stack developer need to have?
A MERN full-stack developer understands all the different parts of an application, such as server-side code (NodeJS), database management (MongoDB), web development (ReactJS), and user interface design (Bootstrap). In short, they can make the front-end and back-end parts of a complete web application development.

Naveen Khanna is the CEO of eBizneeds, a company renowned for its bespoke web and mobile app development. By delivering high-end modern solutions all over the globe, Naveen takes pleasure in sharing his rich experiences and views on emerging technological trends. He has worked in many domains, from education, entertainment, banking, manufacturing, healthcare, and real estate, sharing rich experience in delivering innovative solutions.